- 01Make the press safe and identify the nameplate→
- 02Photograph the plate, cloth, holes, seals, handles, and attachment details→
- 03Measure dimensions and record material and service conditions→
- 04Submit the form, photos, drawing, or sample→
- 05Review compatibility before quotation and batch confirmation
This is a measurement and selection workflow, not permission to open a press under pressure or perform energized maintenance. Plate and cloth compatibility must be confirmed from the actual equipment evidence.
Before You Measure
The confirmed Shengqi plate range is a reference series of 250–2000 mm, with 1000 mm and 1250 mm examples appearing in available material. This range is not a promise that every press accepts every size. The press frame, plate design, chamber depth, handle arrangement, hole pattern, sealing edge, and operating conditions must be matched to the actual equipment.
Use millimetres for dimensions and label every photograph. A ruler or tape in the image helps, but a photograph does not replace written measurements. If a dimension is uncertain, mark it as approximate and include a close view for review.
- Camera or phone with the full plate and close detail capability.
- Tape measure, steel rule, callipers where available, and a marker or labels.
- The equipment nameplate, model, serial number, and any existing plate or cloth identification.
- A clean, safe sample or removable part when the original is available for inspection.
| Record first | Why it matters |
|---|---|
| Press nameplate and model | Confirms the equipment family before a dimensional match is attempted. |
| Existing plate and cloth quantity | Helps check the complete set, not only one isolated component. |
| Material and operating conditions | Affects polymer, fabric, gasket, seam, and corrosion-resistance decisions. |
| Photos with a scale | Shows shape, holes, handles, sealing surfaces, and wear that a number alone cannot show. |
Filter Plate Measurement Steps
For a replacement plate review, the key question is not simply whether the outside dimensions look similar. The sealing profile must close with the mating plate, the feed and filtrate openings must align with the press, and the plate must suit the frame, closing arrangement, cloth attachment, and intended process.
- Step 1 — Photograph the nameplate and write down manufacturer, model, serial number, plate type, and any stamped code.
- Step 2 — Photograph the full front, full back, left and right sides, top edge, bottom edge, handles, sealing edge, recess, and corner details.
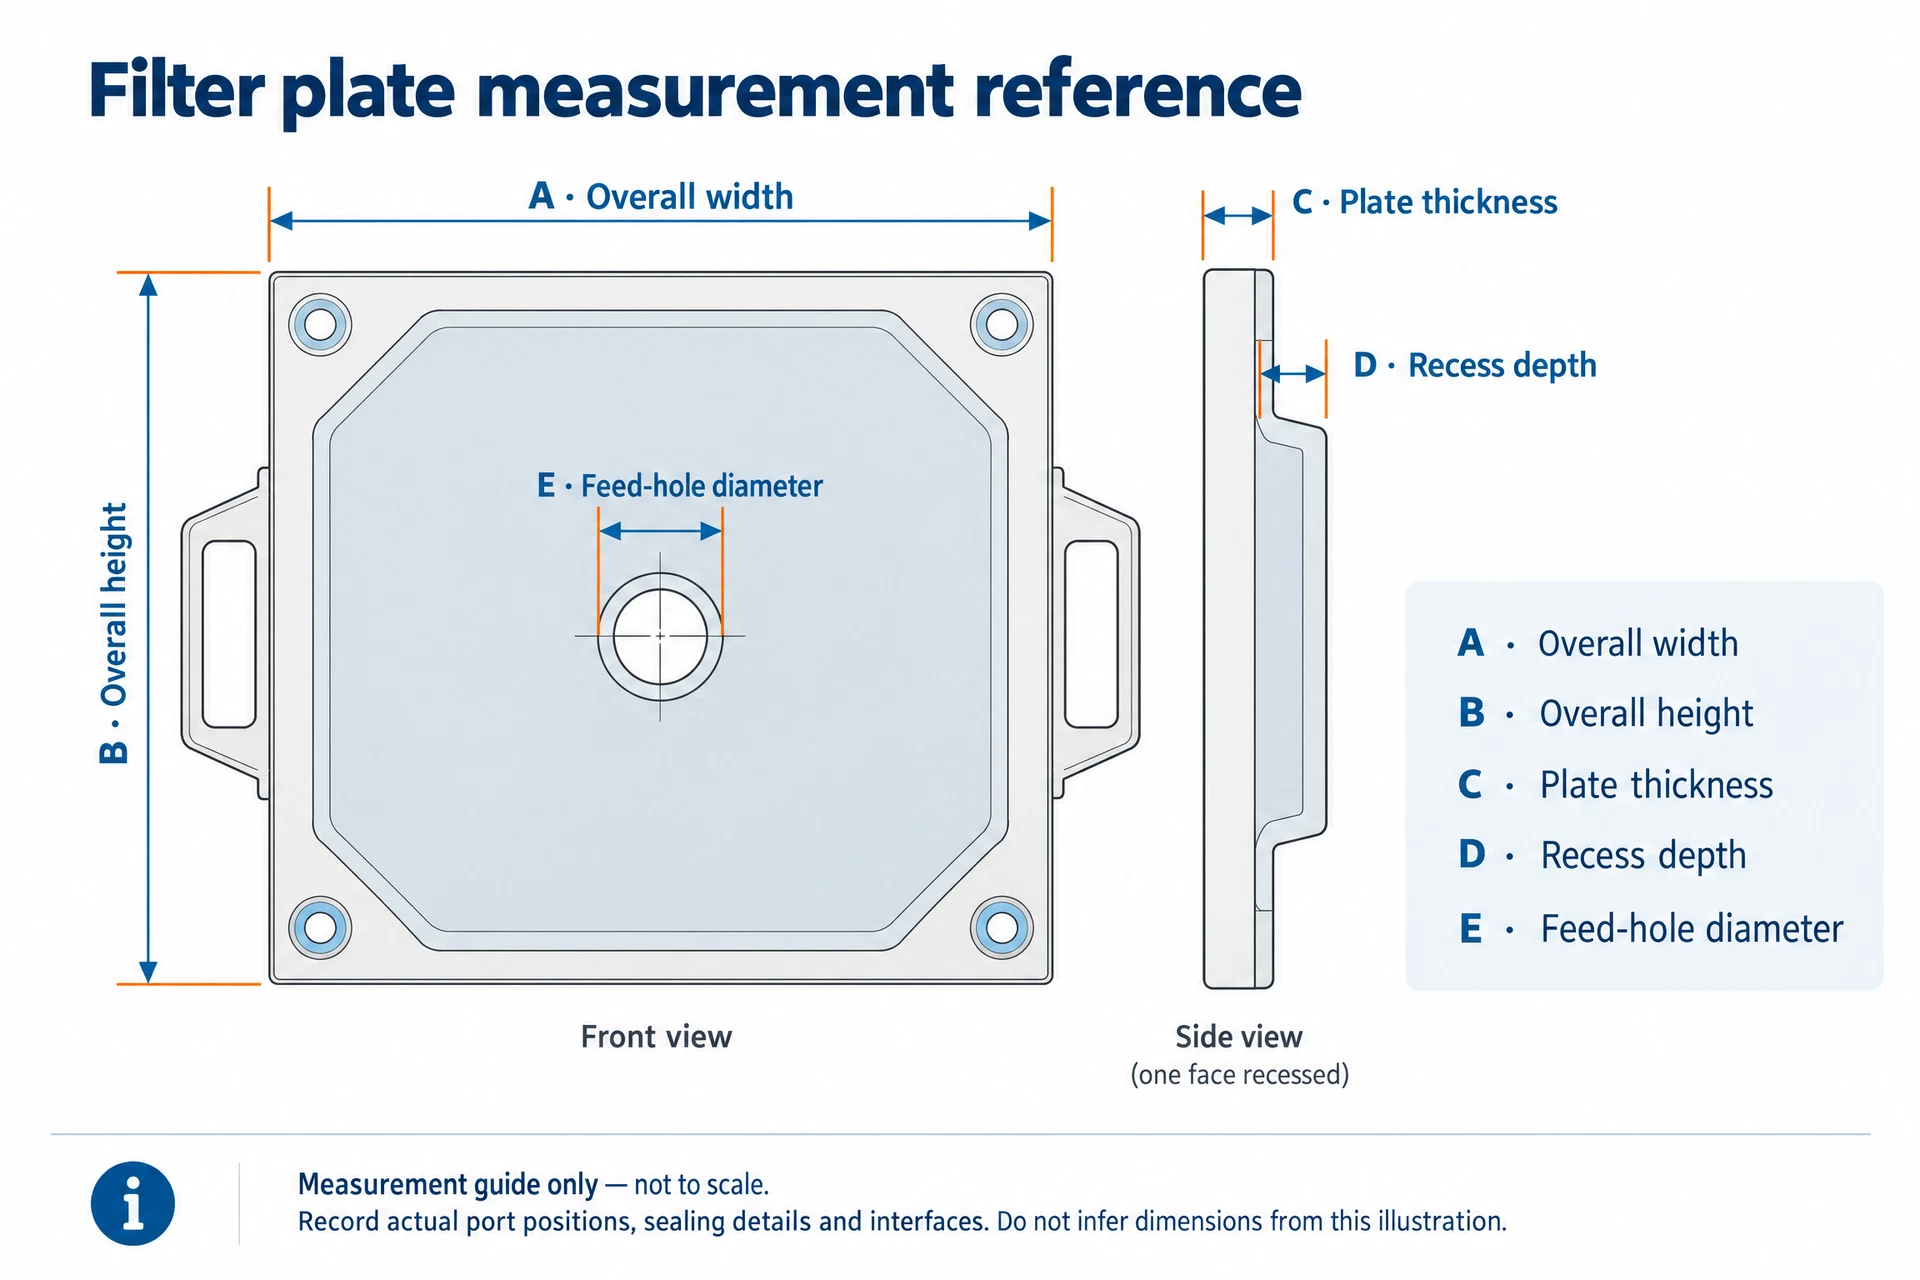
- Step 3 — Measure overall length and width across the plate body. Record where the measurement starts and ends; do not include handles unless they are part of the specified envelope.
- Step 4 — Measure plate thickness and the filter chamber depth or recessed depth. State whether the value is measured on a clean plate or a worn plate.
- Step 5 — Record every feed, filtrate, wash, air, or squeeze opening: position from two reference edges, diameter or shape, and whether it is through-hole, blind, threaded, or fitted.
- Step 6 — Describe the sealing edge, corner pads, handles, side rails, cloth supports, puller contact points, and any damage or permanent deformation.
- Step 7 — Count plates by type and identify any end plate or non-standard plate. Send the drawing, sample, or additional close-up when a hole position cannot be measured confidently.
| Plate field | How to record it |
|---|---|
| Overall size | Length × width in mm, with a labelled face and measurement direction. |
| Thickness and chamber | Plate thickness and recessed/filter-chamber depth in mm; note wear or lining. |
| Hole pattern | Hole name, diameter or shape, and centre position measured from two edges. |
| Sealing and handling | Gasket or sealing land, handle style, side support, and mating-plate arrangement. |
| Material and service | Plate material, slurry, temperature, pH if known, pressure information, and cleaning practice. |
Filter Cloth Measurement Steps
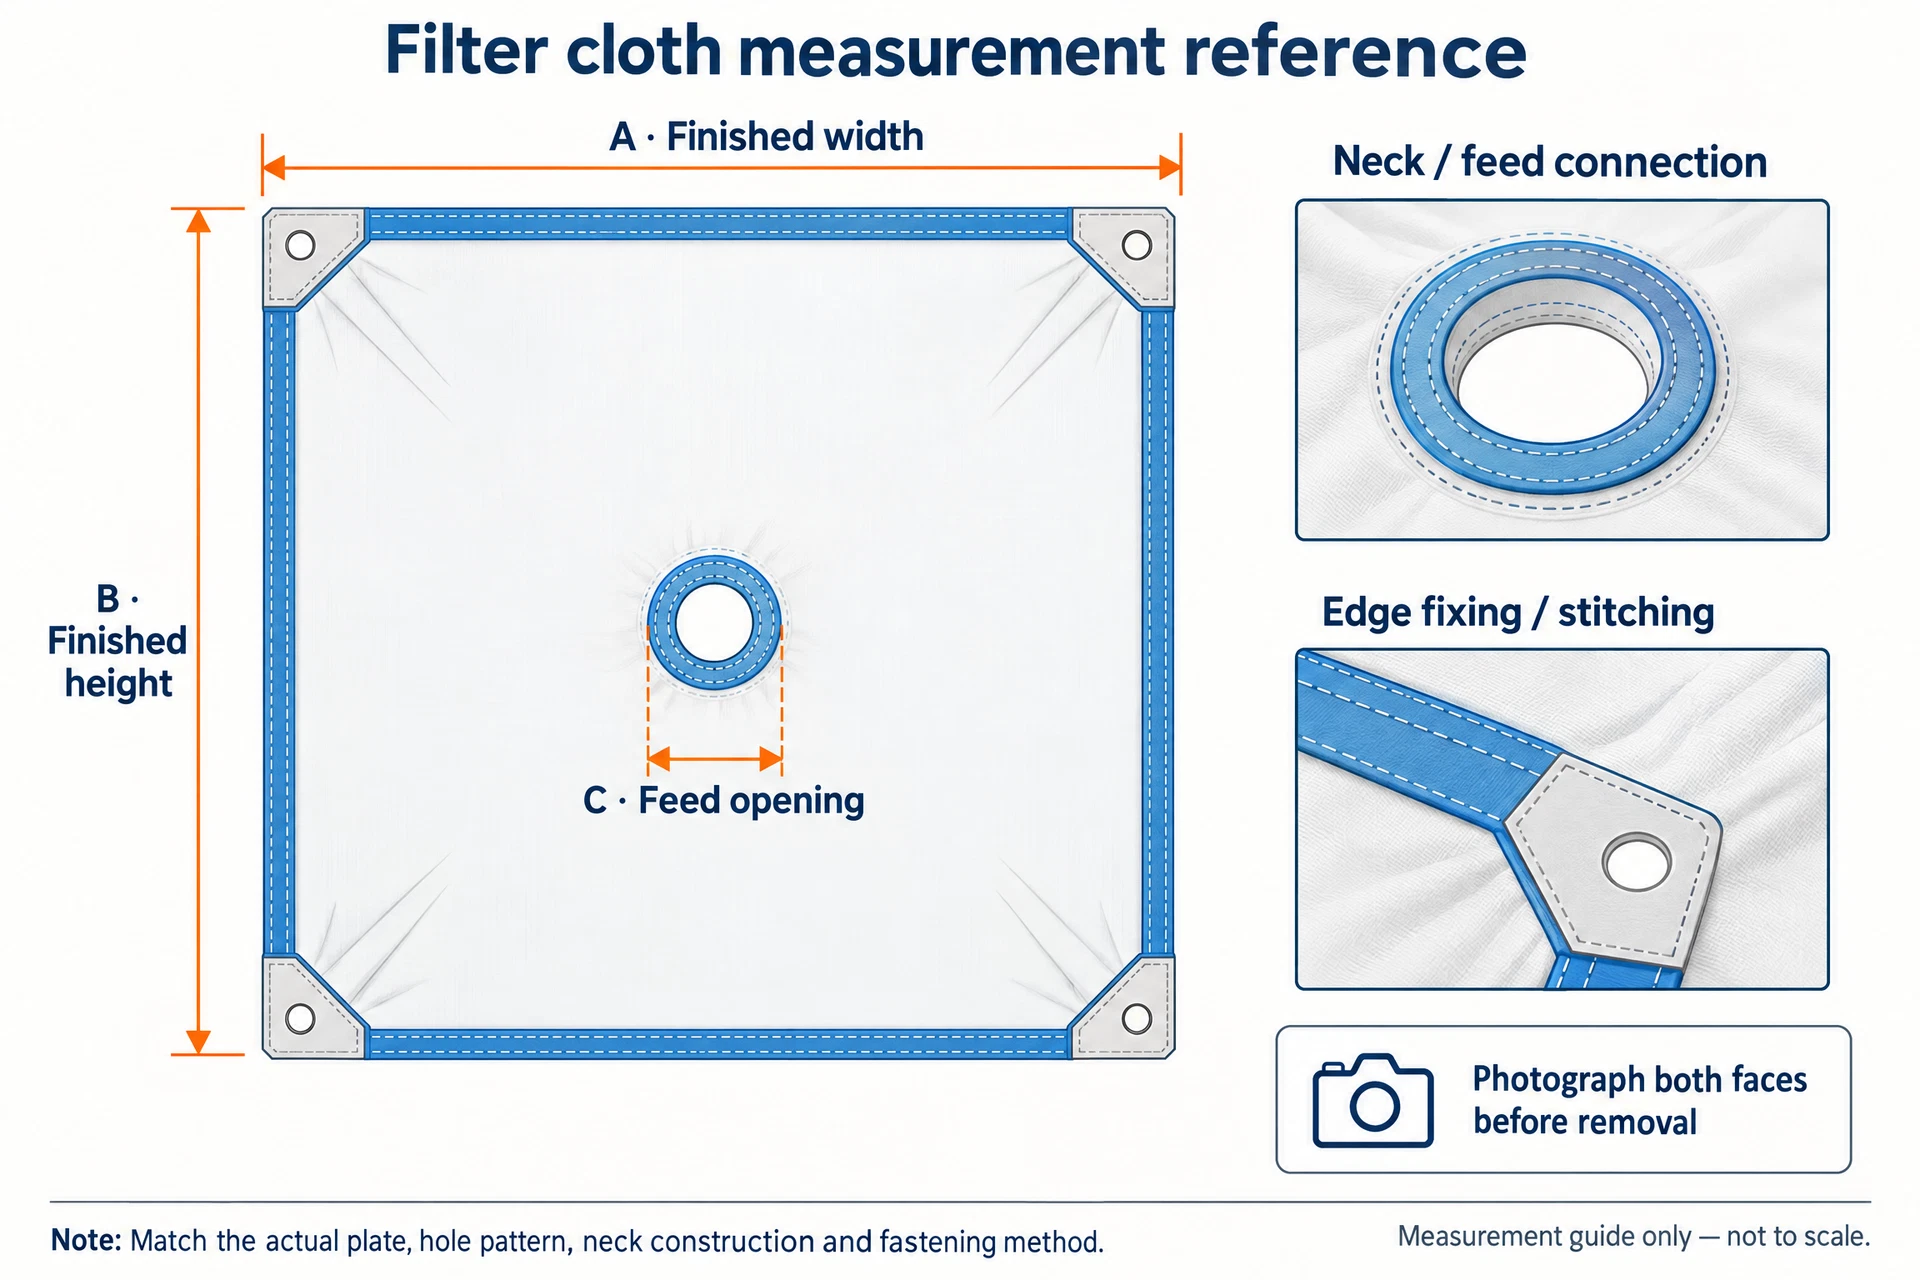
A cloth is a shaped component, not a flat rectangle. Measure it while identifying which side faces the slurry and how it attaches to the plate. A centre-feed cloth, corner-feed cloth, necked cloth, and cloth with separate top and bottom pieces may have similar overall dimensions but cannot be treated as interchangeable without checking the attachment and hole pattern.
- Photograph both sides of the cloth, the slurry-facing side, the clean filtrate side, all edges, the centre or corner opening, neck, eyelets, loops, ties, snaps, and sewn seams.
- Measure finished length and width, opening diameter or shape, neck length and width, edge allowance, seam position, and attachment spacing.
- Record whether the cloth is one piece, two-piece, back cloth, feed cloth, or a special arrangement around a membrane or support surface.
- Write down fabric material if known, weave or construction if known, filtration task, slurry solids, temperature, pH, and any washing or cleaning method.
- Explain whether the request is an original-specification replacement or a proposed change intended to address blinding, leakage, wear, or cake release. A change requires application review and may require a sample test.
| Cloth field | Evidence to send |
|---|---|
| Shape and attachment | Flat outline, installed view, centre or corner hole, neck, edge, seam, and fixing detail. |
| Dimensions | Finished length, width, hole size, neck dimensions, seam allowance, and attachment spacing in mm. |
| Fabric | Known polymer, weave or felt construction, thread, backing, and any label or supplier code. |
| Service condition | Slurry, solids, temperature, pH if known, cycle pattern, washing, and observed failure. |
| Quantity | Required number by cloth type, plus any spare quantity requested for the planned replacement. |
Photo and Submission Checklist
Name files so the review team can connect each image to a measurement: customer_press-model_plate-front.jpg, customer_plate-hole-detail.jpg, or customer_cloth-slurry-side.jpg. Put a ruler in close-up images, keep the camera square to the surface where possible, and avoid glare on sealing faces. Include one wide image showing how the component sits in the press and one detail image for every unusual feature.
- Customer, company, country, contact name, email, and WhatsApp number.
- Press manufacturer, model, serial number, plate size or series if known, and total plate count.
- Plate length, width, thickness, chamber depth, holes, sealing, handles, and plate types.
- Cloth shape, dimensions, openings, neck, fixing, material, seam, and original sample availability.
- Slurry description, solids condition, temperature, pH if known, cycle information, cleaning practice, and the reason for replacement.
- Required quantity, target delivery location, desired original match or improvement review, and attached drawings or samples.
| Measurement form field | Customer entry |
|---|---|
| Customer and equipment | Company / country / contact / press model / serial number |
| Plate data | Length / width / thickness / chamber / hole positions / sealing / quantity |
| Cloth data | Shape / openings / neck / fixing / material / seam / quantity |
| Operating condition | Slurry / solids / temperature / pH / washing / observed issue |
| Attachments | Nameplate / photos / drawing / original sample / dimensional sketch |
Review, Sample Confirmation, and Quotation
The review sequence is: identify the press, compare the dimensional record with photographs, check the plate and cloth interface, confirm materials against the service, request a drawing or sample where necessary, then confirm quantity and quotation scope. A dimensional match alone does not establish pressure suitability, filtration performance, chemical compatibility, or service life.
Do not place a batch order until the approved drawing, sample, or written dimensional confirmation covers the required plate and cloth types.
- Send measurement information and attachments through the request process at /request-a-quote/.
- Ask for replacement filter plates at /filter-plates/replacement-filter-plates/ or custom plates at /filter-plates/custom-filter-plates/.
- Ask for replacement cloths at /filter-cloths/replacement-filter-cloths/ or custom cloths at /filter-cloths/custom-filter-cloths/.
- For an uncertain dimension, send the original sample or a labelled sketch rather than guessing.
Plate & cloth measurement references
These illustrations are measurement guides only, not to scale and not manufacturing drawings. Record dimensions in millimetres from the actual part. Measure only after equipment has been safely isolated, depressurized and secured.
Frequently Asked Questions
Can I select a replacement plate from the outside size alone?
No. Outside length and width are only the first check. Chamber depth, thickness, sealing profile, hole positions, handles, mating plate, cloth attachment, frame arrangement, material, and service conditions must also be reviewed.
Are the 1000 mm and 1250 mm examples suitable for any press?
No. They are examples within the confirmed 250–2000 mm reference series, not a universal compatibility statement. The actual press and plate design must be confirmed from its nameplate, photos, dimensions, and drawings or samples.
Should I send a worn filter cloth?
Yes, if it is safe and available, send the worn cloth together with clear photos and a note describing shrinkage, stretching, tears, blinding, or altered seams. A worn sample is evidence, but dimensions affected by wear should be marked as uncertain.
Can a different cloth material improve filtration?
Possibly, but it is not an automatic substitution. The slurry, temperature, pH, solids, washing method, sealing, fabric construction, and desired result must be reviewed. An improvement request should be treated separately from an original-specification replacement and may require a sample or test.
What happens if I do not know the hole positions?
Send clear front and back photographs with a ruler, a dimensioned sketch, and the original plate or cloth if available. Mark the unknown field as Not Sure; do not infer a hole pattern from a similar-looking image.